How to successfully perform a lung ultrasound scan using the POCUS protocol?
RECOGNISE – OPERATE – ANALYSE
__
By Jeremy Ott / 4th June 2021
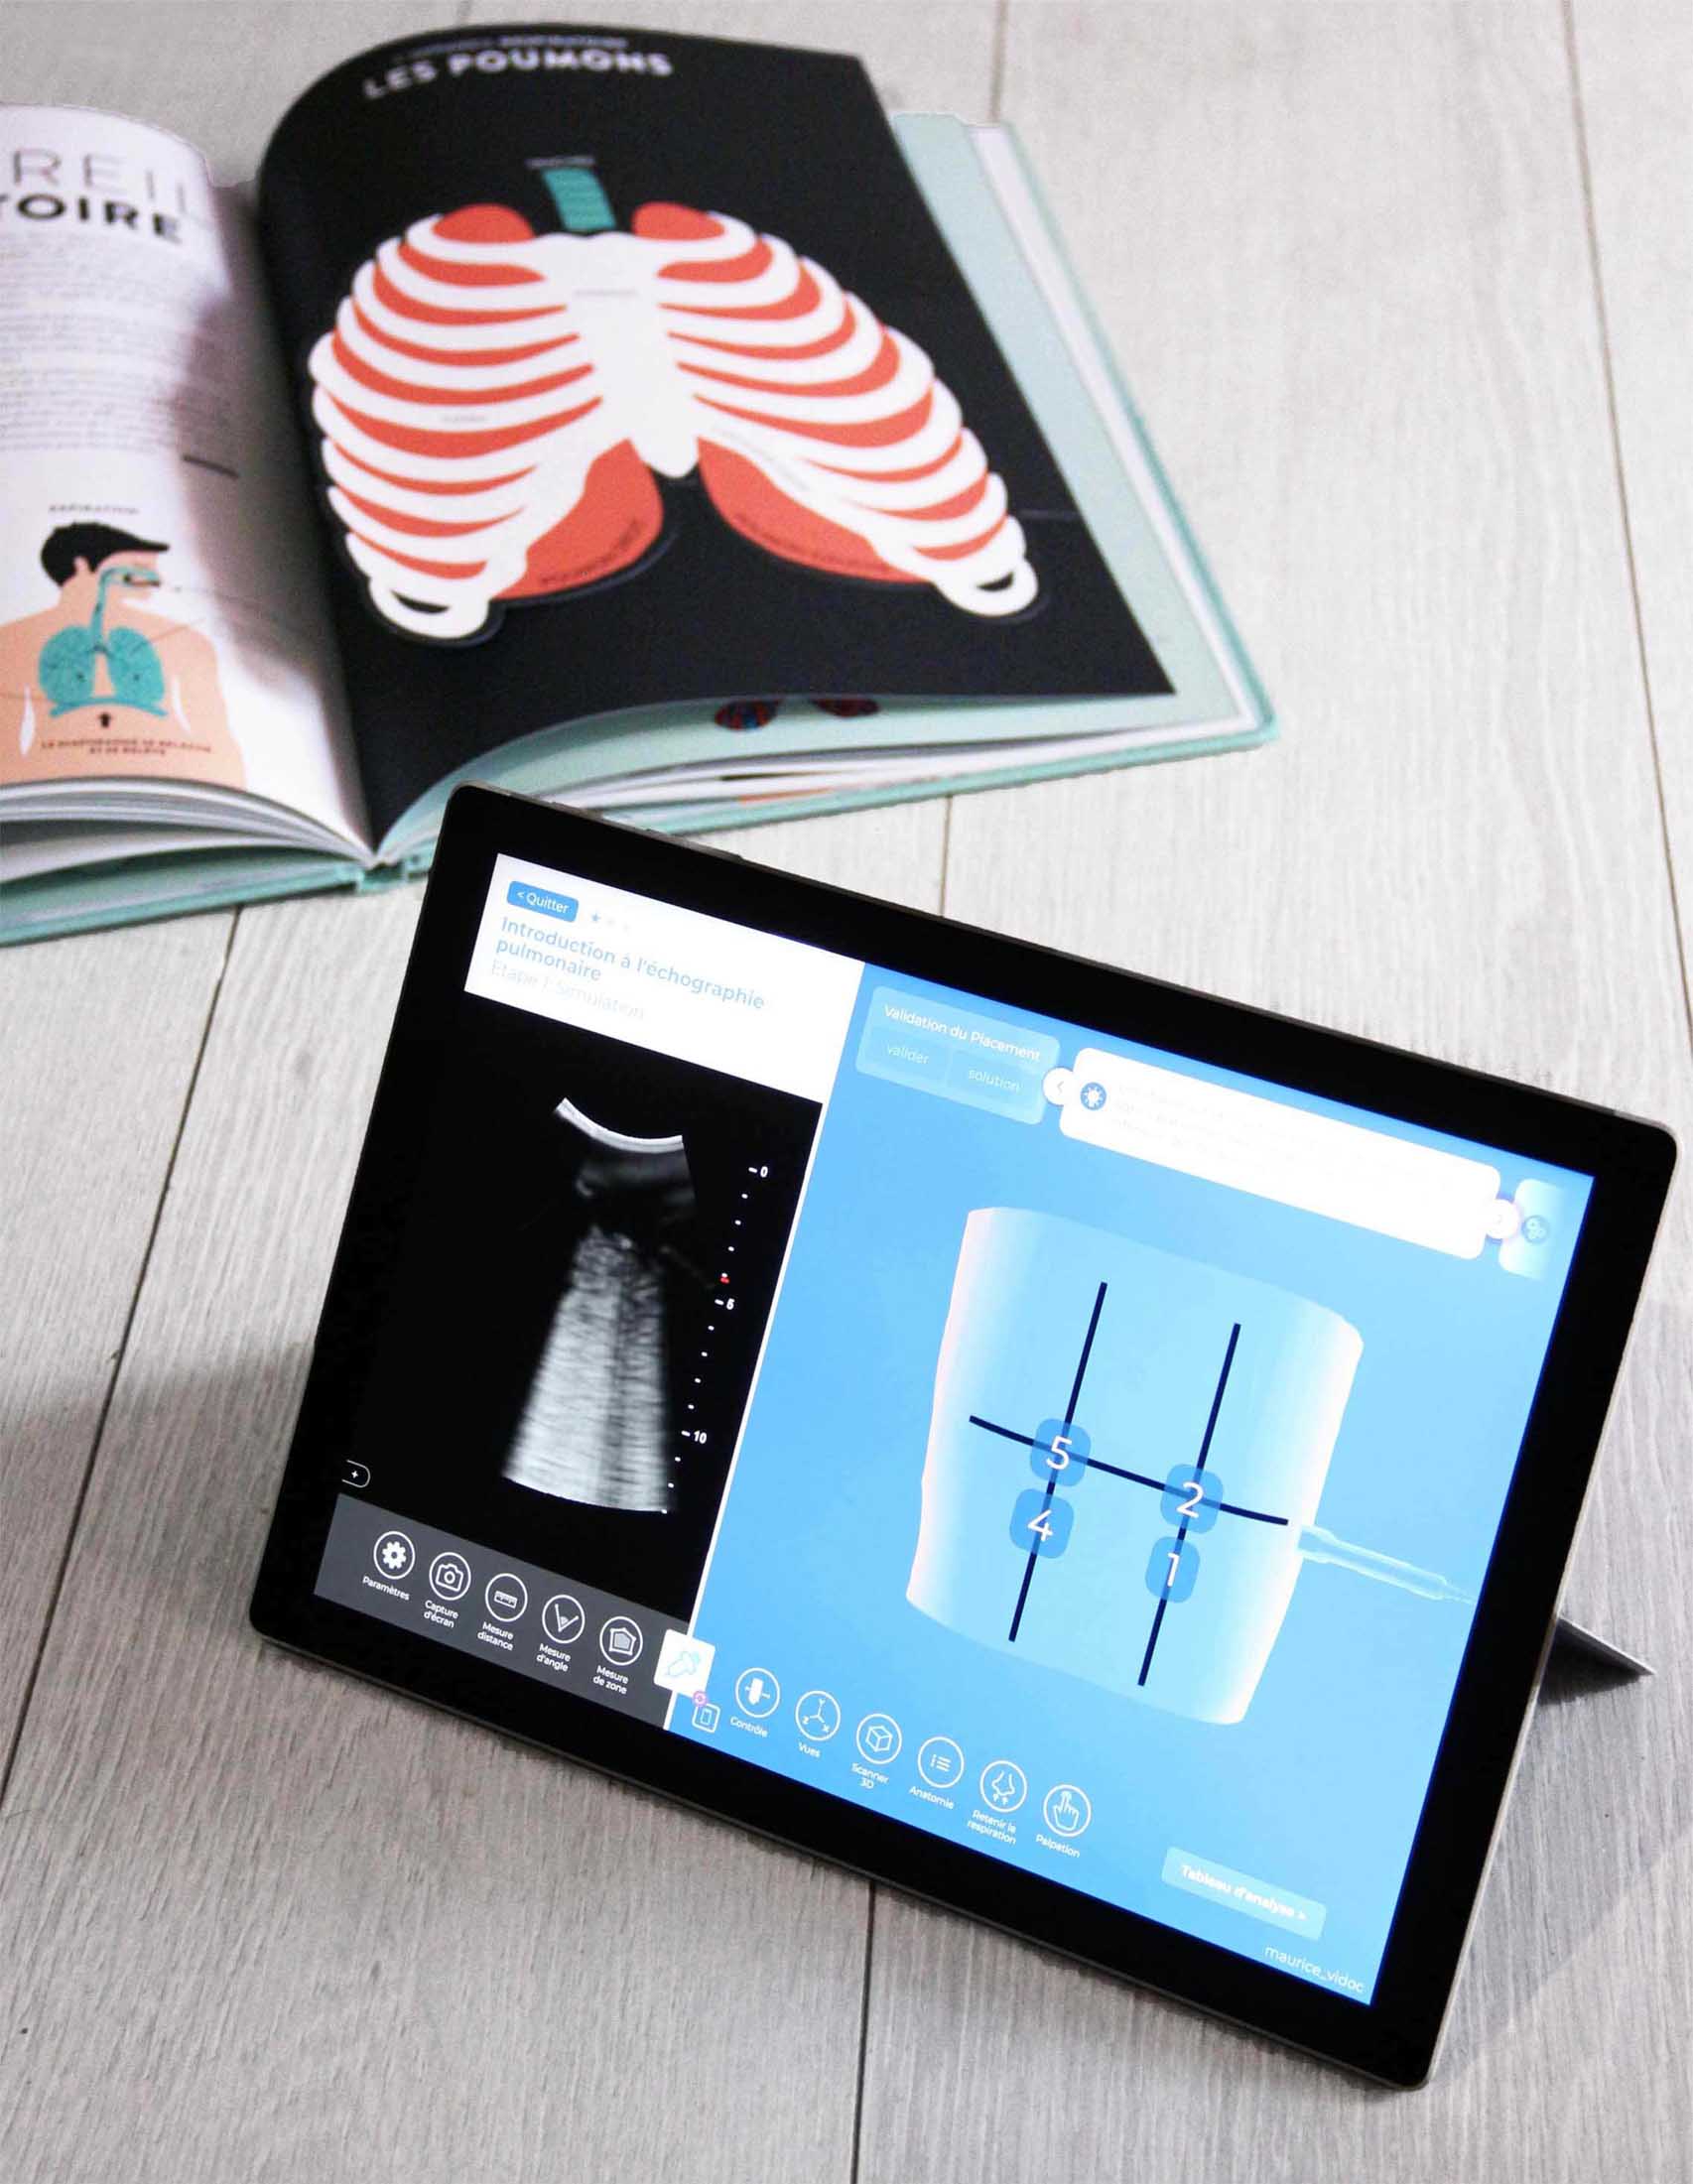
diSplay U/S, online ultrasound simulator : POCUS module
The efficiency of lung ultrasound in the diagnosis of many pathologies is no longer put in question. It is now proven that lung ultrasound is more effective than chest radiography in many situations, and is increasingly used in combination with other conventional medical imaging methods in complete approaches.1, 6
Lung ultrasound has recently been used effectively in the diagnosis of COVID 19 and has highlighted the need for the use of some standard protocols, especially the POCUS protocol.2, 3, 4, 5, 7, 9, 10, 11
What are the different steps to master in order to perform a POCUS lung ultrasound examination? What are the critical points of the procedure, and how do you perform a successful examination using the standardised POCUS protocol?
This is what we invite you to discover in this article! Enjoy your reading…
Interested in going further in the process and apply your ultrasound knowledge? It’s possible, connect in a few clicks on our lung ultrasound simulator: diSplay U/S and get the whole procedure through several exercises which will allow you to discover step by step the bases and nuances of this protocol. Set your simulators, ready, simulate!
YOUR GOALS
01 Identify the steps of a lung ultrasound exam, using the POCUS protocole
02 : Learn how to manipulate your probe to generate good images
03 : analyze the distinctive signals of a proper lung ultrasound scan and abnormalities
Basics of the POCUS standard protocol & anatomical guidelines.
Note: Before doing anything else, don’t forget to adjust the settings of your ultrasound probe, these simple and basic settings will allow you to obtain a clear and consistent ultrasound image.
Cf. article: How to adjust the parameters of the convex probe to perform a successful lung ultrasound?
Cf. “exercise “lung U/S fundamentals” in diSplay U/S
First, what does POCUS really mean?
POCUS is an acronym that stands for Point of Care Ultrasound
More concretely, the aim of this standardised protocol is to carry out a guided ultrasound scan according to a defined procedure, without moving the patient from where he or she is located. This procedure will allow the operator performing the procedure to make a diagnosis and then determine the criticality of the pathology identified and thus direct the management of the patient according to the elements observed in his analysis.
Point-of-care ultrasound completes the physical examination, with the aim of observing and interpreting previously performed findings that may not be clear. It is not limited to its exact definition, it is a fast growing diagnosis method which can be applied in many clinical situations:
The POCUS protocol will identify the presence or absence of specific pathological findings in the patient. Point-of-care ultrasound is a fast growing diagnosis method and can be applied in many clinical situations.
It can also be used in an intensive care unit to monitor treatment, or in an emergency department to exclude or confirm serious pathological findings.
Its potential applications do not end there, as it can also be used to search for free fluid in the abdomen and thorax of traumatic patients and can also be used simply as part of a pre-clinical examination.
To carry out this procedure, the operator will have to analyse the windows, and/or exploration zones. There are 14 of them and they are mainly located on the lateral, anterior and posterior regions.
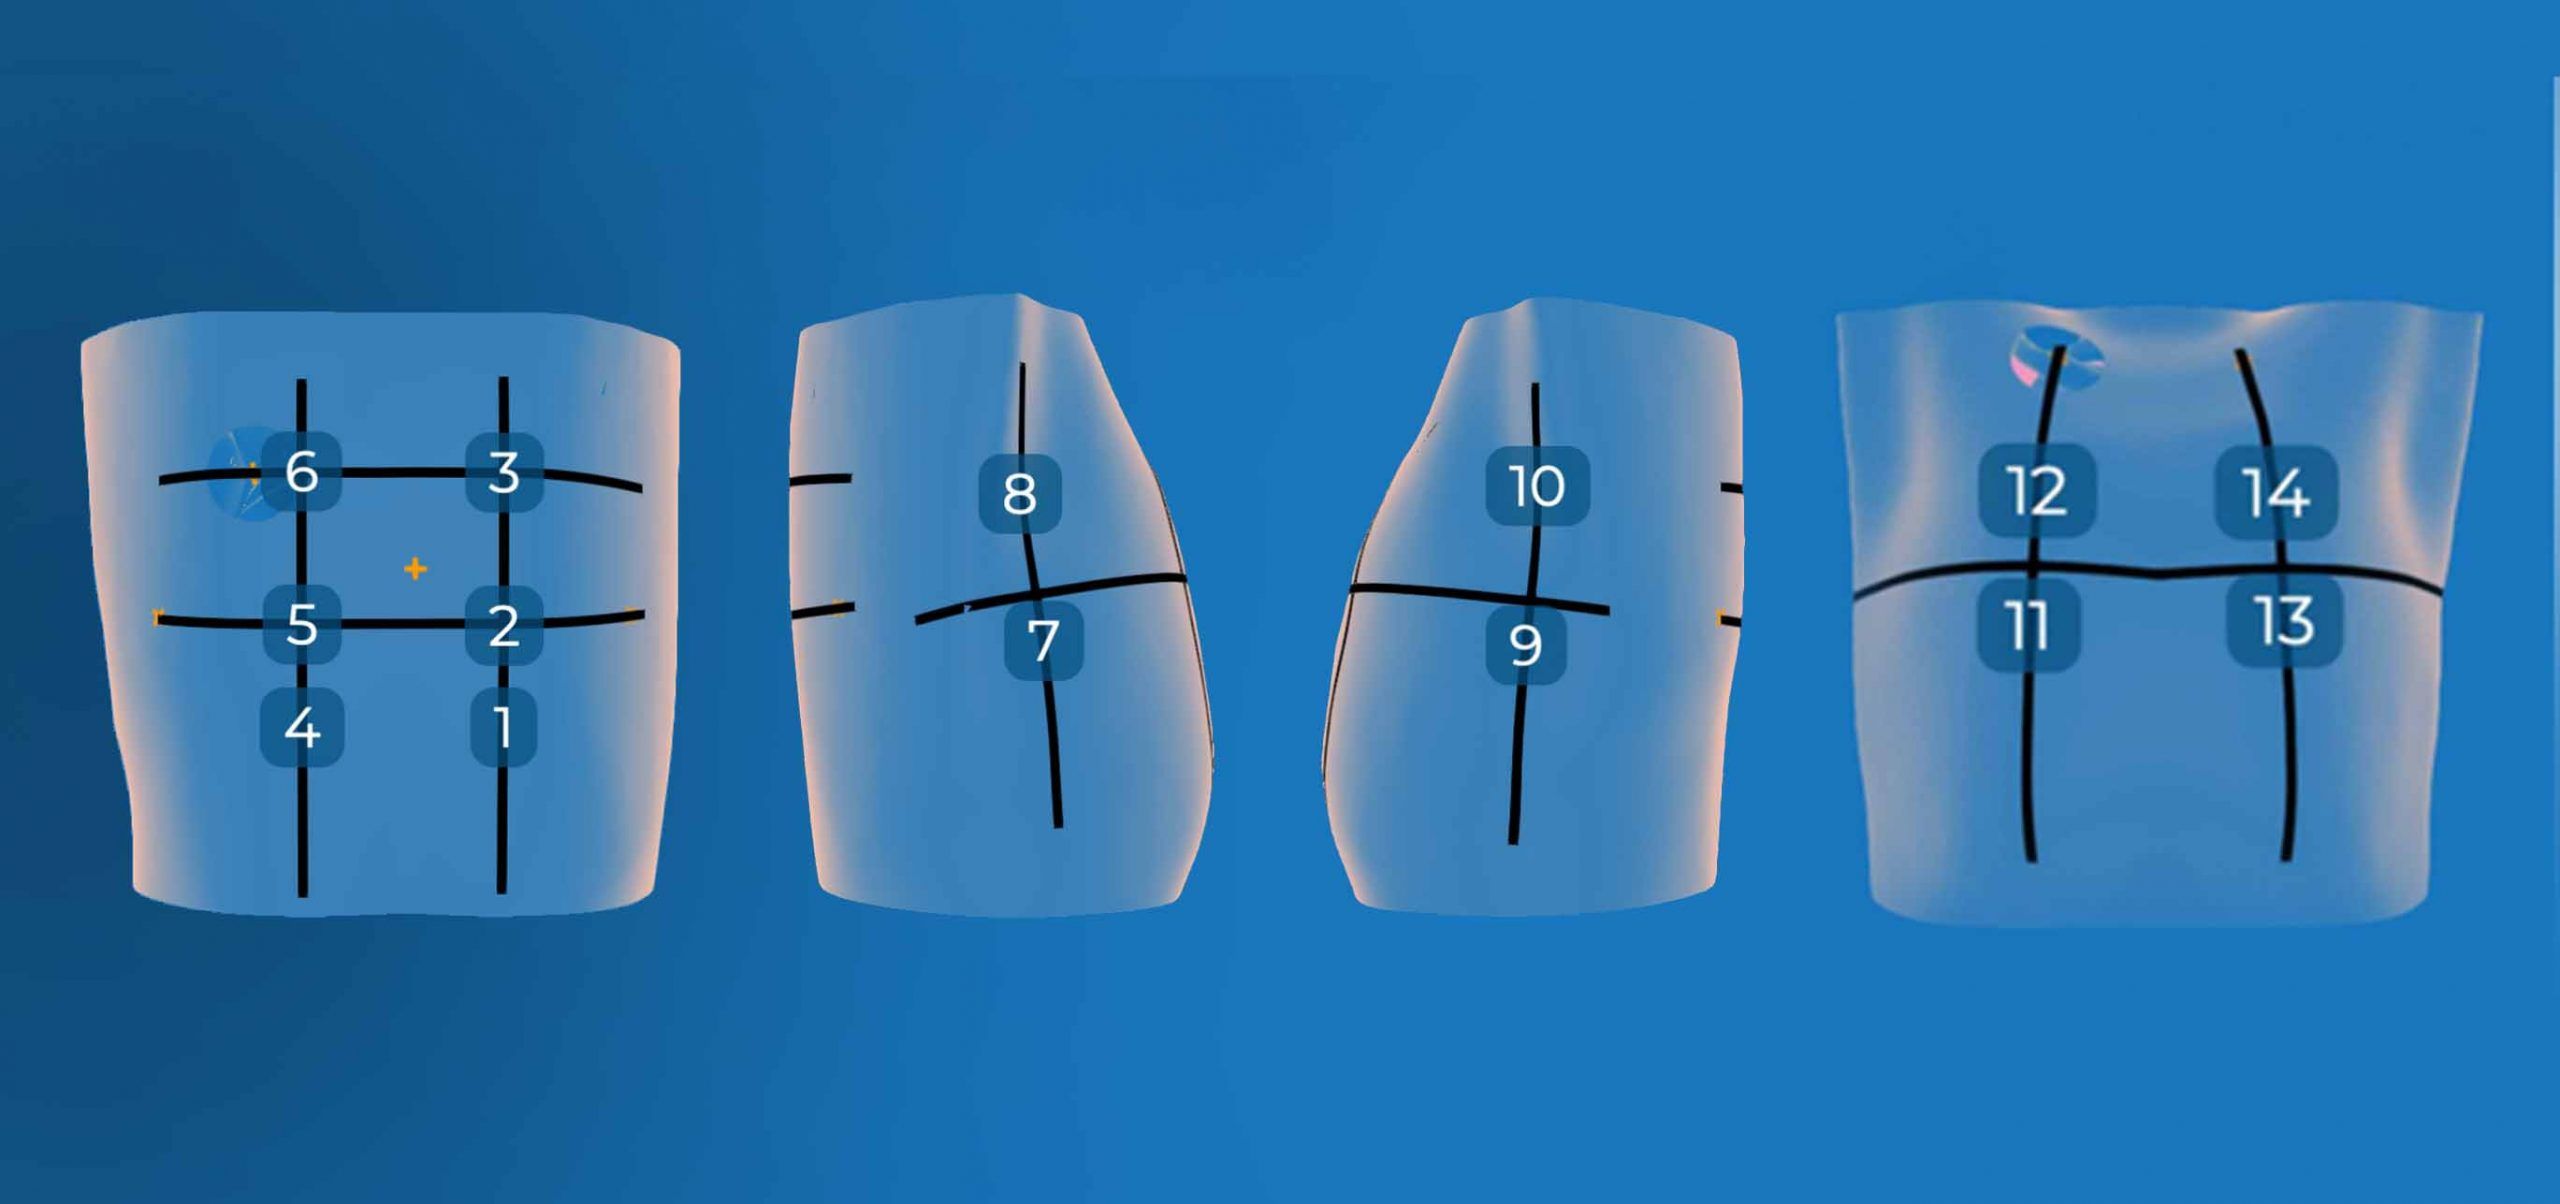
Location of the 14 POCUS windows, image from diSplay U/S simulator
Regarding the anatomical landmarks to identify the exploration areas mentioned before, let’s have a look at the posterior windows first. There are 6 posterior windows in total (numbered from 1 to 6). You can easily locate them by using the following anatomical landmarks.

How to proceed? The first step of the posterior window analysis is to locate the centre of the spine. Once you have located it you can determine the paravertebral lines on either side of the spine. Then position yourself with your probe in the lower right and left corners of the shoulder blades to locate the 1 and 4 windows. These are located a few centimetres below the scapulae on the right and left paravertebral lines previously identified.
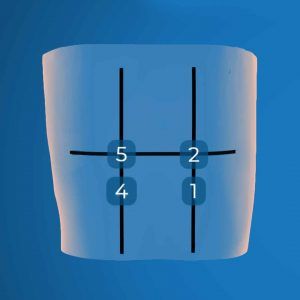
The second step of the procedure is to locate the 5 and 2 windows. These are located at the intersection of the paravertebral lines and the line between the lower angle of the two scapulae. Position your probe on the posterior and medial edge of the right scapular spine to find the 5 window, and then perform the same operation on the posterior and medial edge of the left scapular spine to find the 2 window.
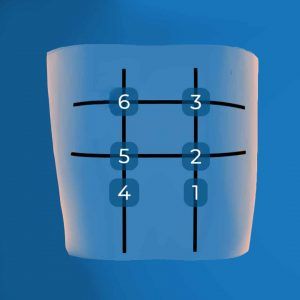
Last step of our exploration of the posterior zones: the location of the 6 and 3 windows. To do this, nothing could be simpler : thanks to the realisation of step 1 and 2, you have normally located the paravertebral lines and the posterior edges of the scapular spines. By positioning your probe at their crossing you will then find the last 2 windows to be analysed in the posterior zone.
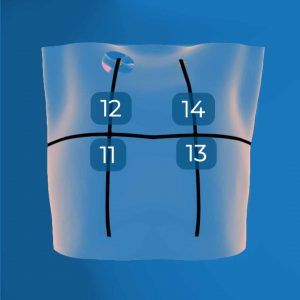
Let’s now get to work on locating the anterior exploration zones by starting with the left clavicle (14 window), then repeat the operation on the right clavicle (12 window). The objective of this operation is to deduce the midclavicular lines based on the position of the clavicles. Thus the horizontal line defined by the nipples will allow you to locate the anterior windows, and thus to finalize your identification of the 11 and 13 windows of the anterior part.
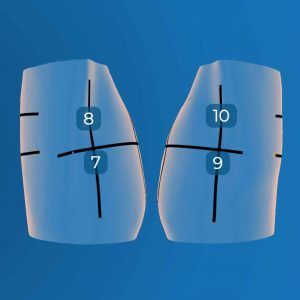
Finally, the last step in the protocol, locating the lateral windows. starting with the right lateral region. Using the horizontal line previously found (as a reminder between the nipples) and the midaxillary line you should now be able to find the right lateral 7 and 8 windows. Using the same principle, we can then move to the left lateral region to find the 9 and 10 windows that are symmetrical to the right lateral windows.
Identifying the 14 windows is a critical part of the process, but it is only the first step. In the second part of this article we will now present some tips on how to produce good scans while keeping the time parameter under control.
How to operate the probe more effectively to generate the right images
You have located the different windows of the protocol, it is now necessary to scan them to analyse the relevant images. But how should this be done? Lung ultrasound relies heavily on the interpretation of artefacts resulting mainly from the interaction between ultrasound and air at the pleural surface.
With optimal positioning on the scan windows and by correctly manipulating your probe in the 14 areas previously identified, you will be able to gather valuable information about your patient’s lungs. However, be aware that lung ultrasound has its limitations and can only be used to interpret superficial tissue features, therefore pathologies deeper in the lungs will remain invisible.
In order to scan your windows, start by positioning your probe on your patient. As part of the standardised POCUS protocol, the scans to be carried out will be in the order of the windows previously identified, from the 1st to the 14th exploration zone, from the posterior to the anterior part, and then end your examination with the exploration of the right lateral and left lateral stations.
To generate correct images you will need to ensure that you have a large area of lung in the scan image.
A scan window is not a specific point but rather an area to be scanned. For lung ultrasound, the difficulty lies in the ability to efficiently scan the intercostal space, the goal of the protocol being to scan at least one intercostal space per station. In order to obtain the sharpest possible ultrasound image, the recommended depth should be about 15 cm and the focal point should correspond to the pleural line. By positioning yourself at its level, you will greatly improve its sharpness. Finally, you can always adjust the parameters of your ultrasound probe in order to recognise any artefacts.
How to be sure to make the optimal scan in 2 steps?
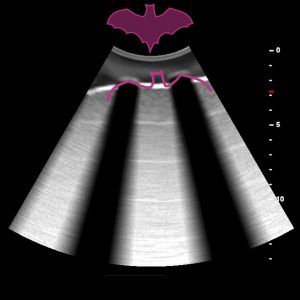
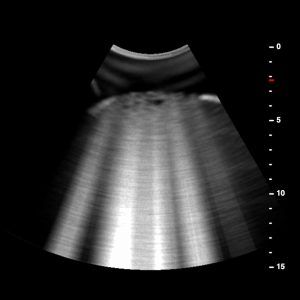
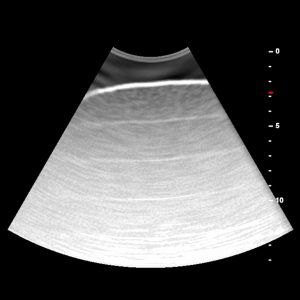
The first step is to identify a pattern known as the “bat sign” and thus see the underlying movement of the lung. The “bat sign” is essential to correctly identify the pleural line, corresponding to the parietal and visceral pleura. A successful lung ultrasound procedure is characterised by the identification of this sign. (In summary the wings are formed by two adjacent ribs, which cast an acoustic shadow, or the body is the pleural line occupying the intercostal space).
The second step, once the “bat sign” has been located, is to rotate the probe so that it is perpendicular to the longitudinal axis of the intercostal space. This manipulation will allow you to adjust your probe until you see mostly lung in the ultrasound image.
By applying these 2 steps you will be optimally positioned to perform a lung condition analysis on your patient. Last but not least, it is important to ask the patient to hold his breath before each station scan and then to walk through the intercostal space between 10 and 20 seconds per window to identify the elements necessary for your analysis without taking the risk of aggravating certain lesions (too long exposure time) or missing certain information (too short exposure time)
Let’s move on to the analysis of the images collected…
Distinctive signals of a proper lung ultrasound scan and abnormalities
You have identified the specific windows of the protocol, and performed your scans, it is now time to analyze your ultrasound images. A simple and effective method of detecting abnormalities in an ultrasound image is to apply yourself to learning the distinctive features of a normal lung scan. By understanding the distinctive features of a “healthy” scan you will then be able to have the basis for recognising potential abnormalities in your image.
Lung ultrasound relies on the interpretation of artefacts, most of which result from the interaction between ultrasound and the pleural surface. The pleural surface is composed of 2 layers (parietal and visceral). Recognition of the pleural line, its patterns and dynamics is crucial and is a key step in a systemic ultrasound scan.
In an ultrasound image of a normal lung you should first observe in your scan the skin wall, then appear the ribs and finally your pleural line. Parallel to the pleural line you should find the A line and perpendicular to it, in the middle of your 2 ribs the B lines, surrounded on both sides by the shadow cones generated by the ribs. In other words, the regular horizontal artefacts reproducing the shape of the pleural line are called A-lines, and constitute a pattern present in healthy areas of the parenchyma; they indicate a healthy lung.